How to use Set-ExternalInOutlook in Powershell

Spotting external emails at a glance can help users avoid phishing attempts and keep their inbox organized, but relying on subject-line modifications isn’t the best approach anymore.
Outlook has a built-in external sender identification feature, and with the Set-ExternalInOutlook cmdlet, admins can enable it, fine-tune how it works, and create exceptions for trusted contacts.
This guide will show you how to set it up using this cmdlet, ensuring your team benefits from external tagging without unnecessary distractions.
What Does Set-ExternalInOutlook Do in PowerShell?
The Set-ExternalInOutlook cmdlet in Exchange Online allows administrators to enable or modify external sender identification in Outlook across different platforms, including Outlook for Windows, Mac, web and mobile.
When enabled, emails from external senders display an "External" tag in the subject line area, helping users identify messages that originate outside the organization.
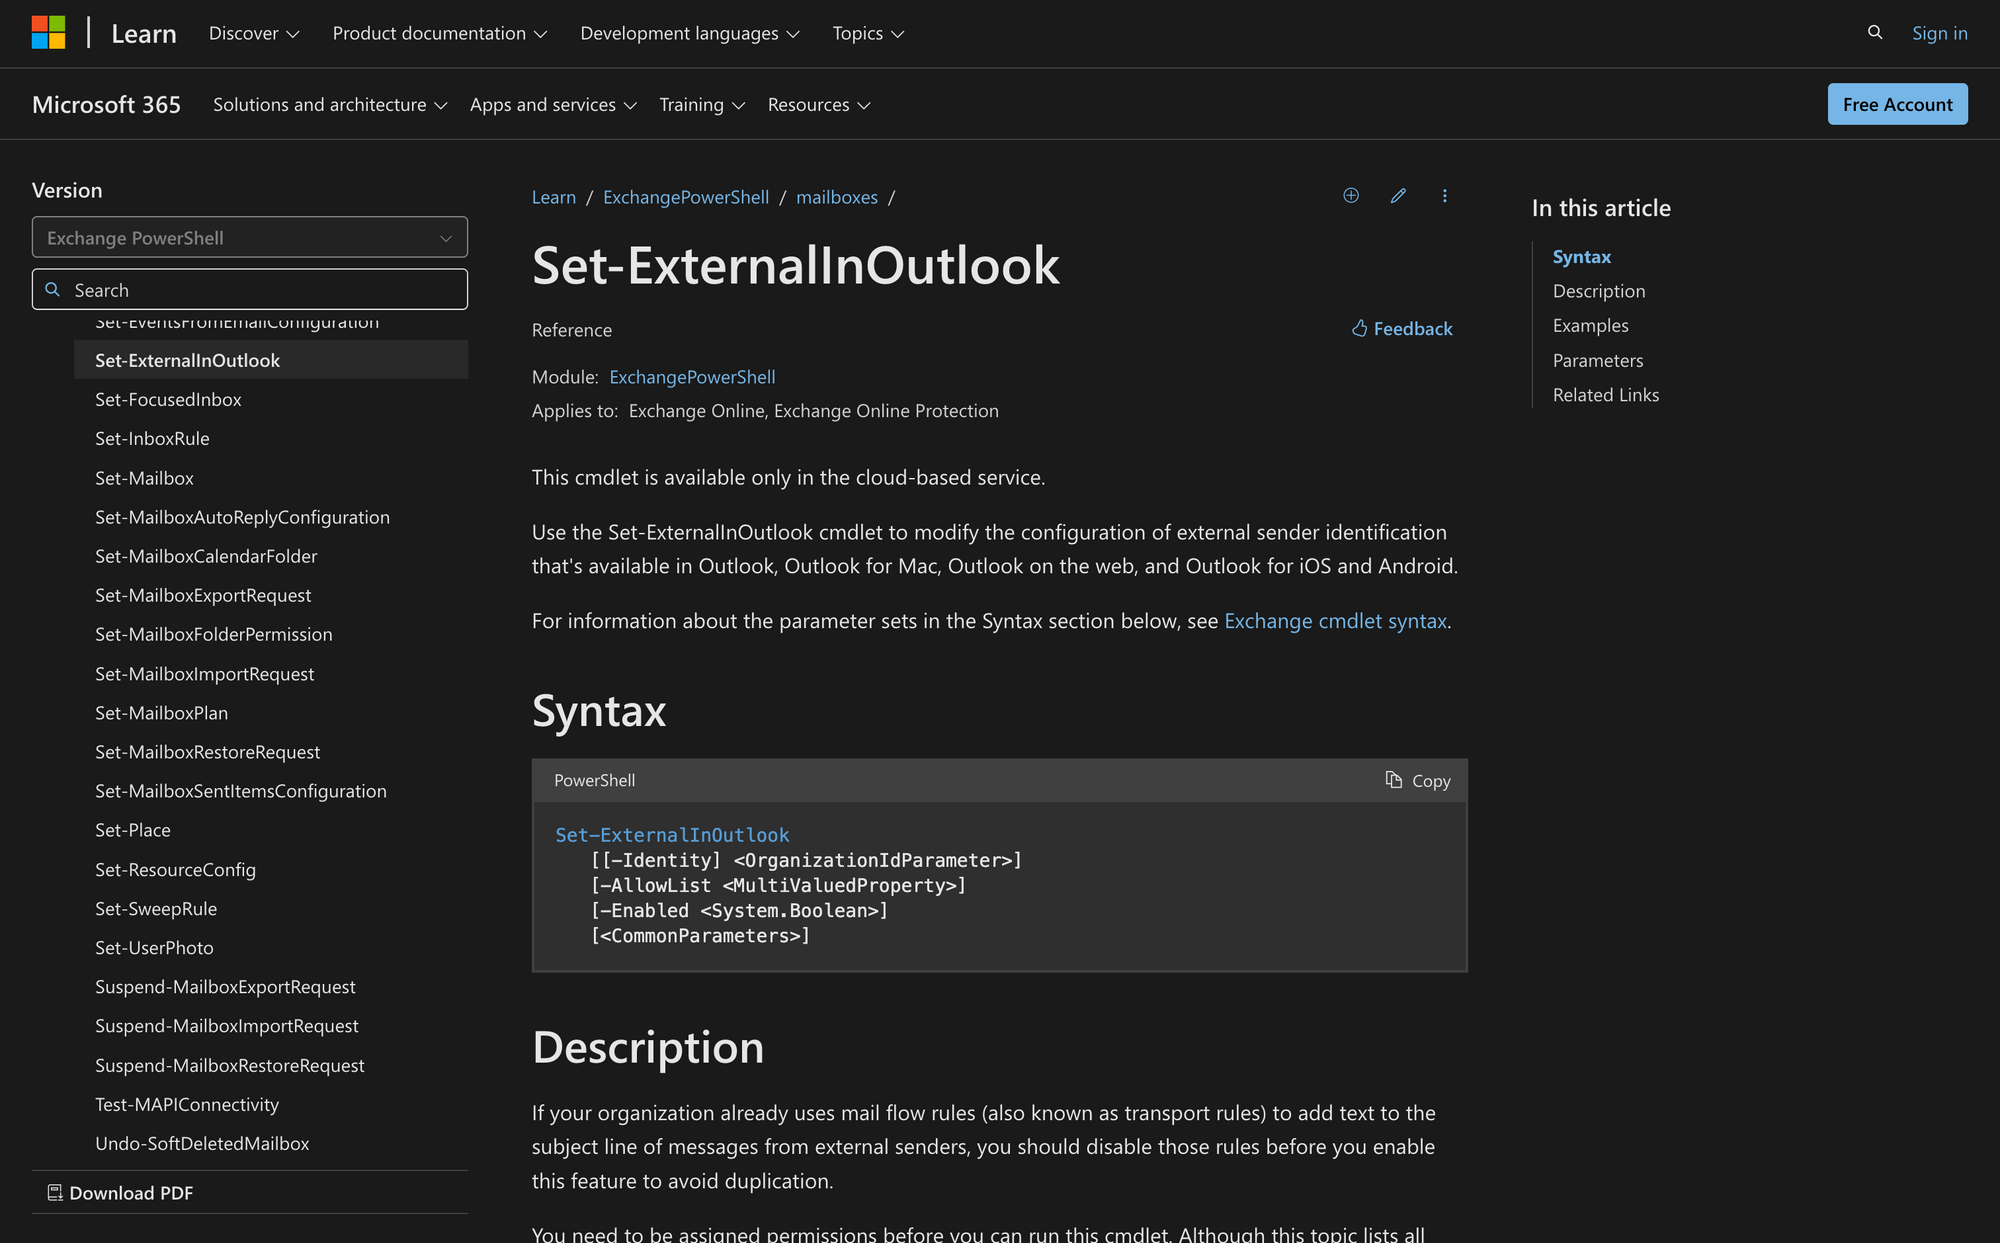
Here’s a quick overview of the Set-ExternalInOutlook cmdlet, including its syntax and the meaning of its parameters:
- -Identity: Specifies the organization's GUID for external sender identification, though it usually resolves automatically.
- -AllowList: Defines a list of trusted email addresses or domains that should be excluded from external sender tagging.
- -Enabled: Turns external sender identification on or off in supported versions of Outlook.
- <CommonParameters>: Includes standard PowerShell parameters for additional command control.
What Can You Use the Set-ExternalInOutlook Cmdlet For?
Keeping your organization's inboxes secure is a top priority, and identifying the source of incoming emails is essential to achieving that.
Let’s see three practical ways you can use this cmdlet to improve email security and management:
- Enable External Email Identification: By turning this feature on, emails from outside the organization will display an "External" tag, helping employees quickly spot messages that might be phishing attempts.
- Create an Exception List for Trusted Senders: Not every external sender should be flagged. With the -AllowList parameter, you can exclude specific addresses or domains, preventing unnecessary warnings for trusted partners and vendors.
- Replace Subject Line Modifications with a Native Outlook Tag: If you’re using mail flow rules to modify subject lines with “EXTERNAL” warnings, this cmdlet lets you switch to Outlook’s built-in identification system, reducing clutter and improving email readability.
What You Need Before Running the Set-ExternalInOutlook Command in PowerShell
Before you can enable external sender identification in Outlook using the Set-ExternalInOutlook cmdlet, there are a few important prerequisites to keep in mind:
- Exchange Online Admin Permissions: This cmdlet is only available in Exchange Online, so you need to have the right admin role assigned. Roles like "Organization Management" or "Security & Compliance Administrator" will grant access.
- No Conflicting Mail Flow Rules: If your organization already uses mail flow rules (transport rules) to tag external emails by modifying subject lines, disable them before enabling this feature to prevent duplicate warnings.
- Proper Allow List Formatting: If you plan to exclude certain email addresses or domains from external tagging, make sure they’re formatted correctly when using the -AllowList parameter. Mistakes in formatting could cause the exclusions to be ignored.
How to Use the Set-ExternalInOutlook Cmdlet in Exchange Online
Now that you know what this command is for, follow this four-step guide to configure it properly.
Step 1: Connect to Exchange Online PowerShell
Before running any Exchange Online cmdlet, you need to connect to your organization’s Exchange environment. This ensures you have the right access and can make changes to your email settings.
To do this, open PowerShell on your computer and run the following command using an admin account:
Replace [email protected] with your actual admin email. If prompted, enter your credentials. Once connected, you’re ready to modify external sender settings.
Step 2: Enable External Email Identification With Set-ExternalInOutlook
By default, external email identification is disabled. If you want Outlook to display an "External" label for emails coming from outside your organization, you need to enable it. Run the following command:
After running this, Outlook will start showing an “External” tag for messages sent from outside your company. However, it can take between 24 and 48 hours for users to see the change.
Step 3: Exclude Trusted Senders from External Tagging
There may be certain external contacts, like partners or vendors, that regularly communicate with your team. To prevent their emails from being flagged as "External," you can add them to the allow list.
For example, if you want to exclude [email protected], use:
To update the list without removing existing entries, use this cmdlet:
This way, you add [email protected] while removing [email protected], without affecting other entries.
Step 4: Verify and Test Your Configuration
Once you've enabled external tagging and set up allow list exceptions, it's important to confirm that everything is working correctly.
Run the Get-ExternalInOutlook command to check your current settings:
This will show whether external tagging is enabled and display the current allow list.
You can send a test email from an external account (one that’s not in your allow list) to an internal user. Check if the "External" label appears in Outlook.
If needed, make adjustments by running the Set-ExternalInOutlook cmdlet again with updated parameters.
By following these steps, you can successfully configure external email identification in Outlook, improving security while keeping trusted senders excluded from unnecessary warnings.
Making External Email Tagging Work for You With Set-ExternalInOutlook
Setting up external email identification in Outlook with the Set-ExternalInOutlook cmdlet is a simple but effective way to help users spot emails from outside senders.
Enabling this feature adds an extra layer of awareness to your inboxes. Using the allow list, you can prevent trusted contacts from being flagged unnecessarily.
Finally, if the cmdlet is not working correctly on your end, here are three things to check:
- Make sure you're connected to Exchange Online: Run Connect-ExchangeOnline before using the cmdlet.
- Check for conflicting mail flow rules: If you have transport rules adding "EXTERNAL" to subject lines, disable them to avoid duplication.
- Verify your settings with Get-ExternalInOutlook: The Get-ExternalInOutlook and Set-ExternalInOutlook cmdlets work together. Using them will confirm whether external tagging is enabled and show your current allow list.